Captain Scarlet Custom Figure
Moderators: chrisbishop, Spectrum Strike Force
Captain Scarlet Custom Figure
![]() by Kambei » Tue May 16, 2006 4:23 pm
by Kambei » Tue May 16, 2006 4:23 pm
Again I used this figure as I did for Captain Black:
http://www.microforever.com/materialforceM01.htm
I will be putting together a 'How-To-Make-It' page with photos I took over the three days it took me to get this custom right.
I am also taking some pictures that will recreate some of the end credits paintings, and one or two I will make up myself.
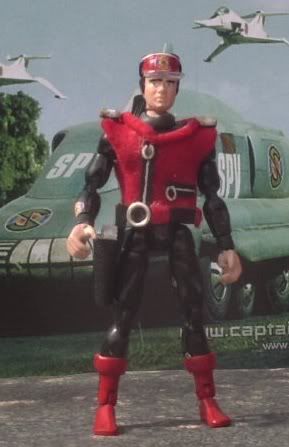
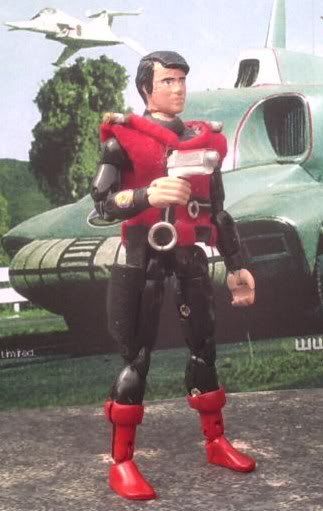
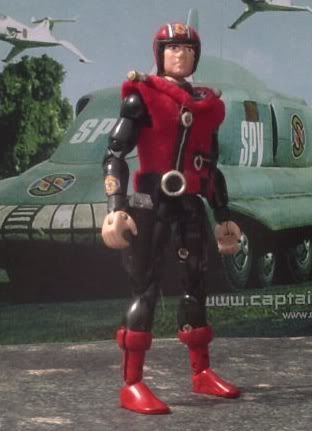
Those are three separate heads. Making a head with just the hair and then adding a hat/helmet never looks right as the hat always seems too big.
I will be starting on Destiny next week, and then Blue, White and Green.
http://www.microforever.com/materialforceM01.htm
I will be putting together a 'How-To-Make-It' page with photos I took over the three days it took me to get this custom right.
I am also taking some pictures that will recreate some of the end credits paintings, and one or two I will make up myself.
Those are three separate heads. Making a head with just the hair and then adding a hat/helmet never looks right as the hat always seems too big.
I will be starting on Destiny next week, and then Blue, White and Green.
War is Peace. Ignorance is Strength. Freedom is Slavery.
-
Kambei

- Captain

- Posts: 291
- Joined: Mon Feb 21, 2005 4:57 pm
- Location: In The Village, where your days are numbered, and so are you!
![]() by Sage » Tue May 16, 2006 4:54 pm
by Sage » Tue May 16, 2006 4:54 pm
Those are great 
Critics are like eunuchs in a harem; they know how it's done, they've seen it done every day, but they're unable to do it themselves.
Brendan Behan
My fanfic100 table
Brendan Behan
My fanfic100 table
-
Sage

- Major

- Posts: 764
- Joined: Tue Nov 30, 2004 10:06 pm
- Location: Scarlet's ancestral stomping ground
![]() by DartBrat701 » Wed May 17, 2006 12:51 am
by DartBrat701 » Wed May 17, 2006 12:51 am
Excellent, Kambei! FAB-u-lous! 
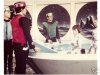
I especially like the SPV & Angel Fighters backdrop, nice touch!!

I especially like the SPV & Angel Fighters backdrop, nice touch!!
"In promulgating your esoteric congitations and articulating your superficial sentimentalities, amicable, philosophical and psychological observations...beware of platitude misconderosities!!"
-
DartBrat701

- Major
- Posts: 428
- Joined: Mon Mar 20, 2006 7:15 pm
- Location: Michigan
![]() by Kambei » Wed May 17, 2006 9:34 am
by Kambei » Wed May 17, 2006 9:34 am
Thanks. These figures started out as an experiment. I will be adding a Destiny Angel figure as soon as the figure arrives from Japan.
I will be adding another pic to my End-Credits thread as soon as I dig out my old GI Joe MOBAT tank.
I will be adding another pic to my End-Credits thread as soon as I dig out my old GI Joe MOBAT tank.
War is Peace. Ignorance is Strength. Freedom is Slavery.
-
Kambei
- Captain
- Posts: 291
- Joined: Mon Feb 21, 2005 4:57 pm
- Location: In The Village, where your days are numbered, and so are you!
![]() by DartBrat701 » Thu May 18, 2006 1:16 am
by DartBrat701 » Thu May 18, 2006 1:16 am
Will you get one with Captain Ochre? 
"In promulgating your esoteric congitations and articulating your superficial sentimentalities, amicable, philosophical and psychological observations...beware of platitude misconderosities!!"
-
DartBrat701
- Major
- Posts: 428
- Joined: Mon Mar 20, 2006 7:15 pm
- Location: Michigan
![]() by Kambei » Thu May 18, 2006 8:49 am
by Kambei » Thu May 18, 2006 8:49 am
DartBrat701 wrote:Will you get one with Captain Ochre?
Eventually. Can't afford to buy too many at one time.
War is Peace. Ignorance is Strength. Freedom is Slavery.
-
Kambei
- Captain
- Posts: 291
- Joined: Mon Feb 21, 2005 4:57 pm
- Location: In The Village, where your days are numbered, and so are you!
![]() by Doc » Thu May 18, 2006 10:37 am
by Doc » Thu May 18, 2006 10:37 am
Very nice work! The Bandai figures could have used some serious interchangeable head action, their hats are huge...
Looking forward to seeing Destiny.
Doc
Looking forward to seeing Destiny.
Doc
-
Doc
- Ensign

- Posts: 93
- Joined: Tue Nov 15, 2005 12:01 pm
- Location: London
![]() by Kambei » Thu May 18, 2006 12:35 pm
by Kambei » Thu May 18, 2006 12:35 pm
Doc wrote:Very nice work! The Bandai figures could have used some serious interchangeable head action, their hats are huge...
Looking forward to seeing Destiny.
Doc
I will be using the white version of this figure for Destiny. http://www.microforever.com/2004LMFSeries1.htm Over the next couple of months, I will be doing the rest of the Angels as well. This is all your fault, Doc!
 You inspired me to do the full set when I saw your NCS Angels.
I know what you mean about the hats. They never sit right on moulded heads.
War is Peace. Ignorance is Strength. Freedom is Slavery.
-
Kambei
- Captain
- Posts: 291
- Joined: Mon Feb 21, 2005 4:57 pm
- Location: In The Village, where your days are numbered, and so are you!
![]() by Doc » Thu May 18, 2006 2:48 pm
by Doc » Thu May 18, 2006 2:48 pm
Kambei wrote:This is all your fault, Doc!
Sorry Kambei! I'm working on some more Angels at the moment, so you're not alone! Will the customizing never end?
-
Doc
- Ensign
- Posts: 93
- Joined: Tue Nov 15, 2005 12:01 pm
- Location: London
![]() by Doc » Thu May 18, 2006 9:31 pm
by Doc » Thu May 18, 2006 9:31 pm
Kambei wrote:End? What is this 'end' of which you speak?
Hey, I'm limited by that damn colour chart! Captain Ecru? I nearly did. Captain Whiter Shade of Pale is only a few months away...
You have galvanised me to make a classic series Scarlet from a Bandai NCS figure though. Once the new Angels are done!
'Tis a shame we have jobs, or we could fill the world with these little plastic fellas...
Oh, and I never said thanks for the Milliput tip - great stuff.
-
Doc
- Ensign
- Posts: 93
- Joined: Tue Nov 15, 2005 12:01 pm
- Location: London
![]() by Kambei » Sat May 20, 2006 12:24 pm
by Kambei » Sat May 20, 2006 12:24 pm
I am starting on the head casts and sculpting for Captain Blue this afternoon. All being well, he should be online by the end of the week.
Stop drooling, ladies!
Stop drooling, ladies!
War is Peace. Ignorance is Strength. Freedom is Slavery.
-
Kambei
- Captain
- Posts: 291
- Joined: Mon Feb 21, 2005 4:57 pm
- Location: In The Village, where your days are numbered, and so are you!
![]() by Kambei » Sun May 21, 2006 3:42 pm
by Kambei » Sun May 21, 2006 3:42 pm
Had a couple of requests to see how the figure is done. The pics are here:
http://s22.photobucket.com/albums/b317/ ... m%20Tunic/
The instructions are here: (alternatively, if your brain explodes after part 6, you could always comission a customiser to make whichever colour you need )
Making a OCS Spectrum Tunic for a Microman Figure (or other as preference)
The Head:
A) Selection of the head is important. Check the head size against the figure and to find out if it needs sanded, drilled for a head peg, a neck peg added or sculpted. I have used heads cast from an original. The head was bald, so I used two part epoxy modelling clay to sculpt the hair, hat and helmet onto three separate heads. I sanded the neck down to the jawline to match the neck on the figure and drilled up into the head so that it will fit onto the neck peg of the figure. I then painted the heads in the appropriate colours. I use acrylics for preference as they adhere well to most surfaces and have a fast drying time.
B) I added the Spectrum logo and a visor to Scarlet's cap. The logos were printed out from my computer using Dark T-Shirt inkjet transfer paper. It comes as a polymer film on a backing sheet and is quite thin, so it comes in very useful for this kind of work. Using a computer is best for this as photo manipulation programs are easier to use for the sizing of the image, and multiple images are easier to put onto one sheet. If you are going to use paper, then I would advise using coated or glossy paper, and carefully lacquering over it after to prevent smudging.
The visor is a small piece of clear acetate cut from the plastic bubble that came with another action figure. It is cut larger than necessary, then glued into place on the cap and cut down to size.
The Tunic:
I use the Microman Material Force figures for these customs as they are extremely posable, but can also be disassembled to make it easier to make the tunic. A band of modelling clay is added around the neck and calves to simulate the collar and boot tops.
1) Cut a piece of fabric into a rectangle 2 & ½ times the length of the torso. This will allow for it to go over the neck. It should also be slightly wider than the shoulders. See the pic for comparison. I have used felt for this as it does not fray and is easy to work with. It is also available in smaller pieces and comes in a wide range of colours.
2) Cut a hole in the exact centre of the felt. Make it larger than the neck to allow for the collar later.
3) Try the felt onto the figure to test for size and fit. This will give an idea of how much you will need to trim or if you need a longer/wider piece. If necessary repeat steps 1 and 2.
4) Make slits from the side just under the armpits front and back on each side. Then trim the sides so that the overlap will not be too much. This may need to be repeated later.
5) Place the felt back on the figure. Trim the side seams if necessary. I have used Evostick Impact glue to seal the seam. Pull the flaps from front to back, making sure that there is not too much slack around the waist. Then trim a glue the flaps into place on one side.
6) Repeat with the other side, taking care not to rip the felt under the arms and again making sure that there is not too much slack around the waist.
7) Using small sharp scissors, trim the shoulder part so that it now arches upwards both front and back.
8 ) I made the holster by cutting a shape from thin black vinyl. It is turned into a working holster by putting a thin amount of glue on the fabric side and pressing it together.. I then put a thin piece of vinyl on one side to act as a connector to the belt.
9) With the tunic finished, it is time to add the adornments. Thin vinyl strips were cut and glued onto the felt to make the zips and belt. The felt in the foreground is a thin piece glued and folded over on itself to make the collar.
10) Small pieces of felt are glued over the belt to simulate the belt loops.
11) the same for the holster using the strap glued between the belt and holster.
12) The collar is added to the tunic by gluing it into place. The hands and boots are primed ready for painting whichever colour coded captain you are making. A fine line of silver paint is striped down the vinyl for the zip.
13) Links from fine chains are used to simulate the zipper catches and the belt buckle. Two small pieces of hardened clay are added to the shoulders for the communicator flasher and painted white and gold. The hands are painted in the appropriate flesh tones and the boots are painted to co-ordinate with the tunic. The head is then added and the figure is complete.
http://s22.photobucket.com/albums/b317/ ... m%20Tunic/
The instructions are here: (alternatively, if your brain explodes after part 6, you could always comission a customiser to make whichever colour you need
)
Making a OCS Spectrum Tunic for a Microman Figure (or other as preference)
The Head:
A) Selection of the head is important. Check the head size against the figure and to find out if it needs sanded, drilled for a head peg, a neck peg added or sculpted. I have used heads cast from an original. The head was bald, so I used two part epoxy modelling clay to sculpt the hair, hat and helmet onto three separate heads. I sanded the neck down to the jawline to match the neck on the figure and drilled up into the head so that it will fit onto the neck peg of the figure. I then painted the heads in the appropriate colours. I use acrylics for preference as they adhere well to most surfaces and have a fast drying time.
B) I added the Spectrum logo and a visor to Scarlet's cap. The logos were printed out from my computer using Dark T-Shirt inkjet transfer paper. It comes as a polymer film on a backing sheet and is quite thin, so it comes in very useful for this kind of work. Using a computer is best for this as photo manipulation programs are easier to use for the sizing of the image, and multiple images are easier to put onto one sheet. If you are going to use paper, then I would advise using coated or glossy paper, and carefully lacquering over it after to prevent smudging.
The visor is a small piece of clear acetate cut from the plastic bubble that came with another action figure. It is cut larger than necessary, then glued into place on the cap and cut down to size.
The Tunic:
I use the Microman Material Force figures for these customs as they are extremely posable, but can also be disassembled to make it easier to make the tunic. A band of modelling clay is added around the neck and calves to simulate the collar and boot tops.
1) Cut a piece of fabric into a rectangle 2 & ½ times the length of the torso. This will allow for it to go over the neck. It should also be slightly wider than the shoulders. See the pic for comparison. I have used felt for this as it does not fray and is easy to work with. It is also available in smaller pieces and comes in a wide range of colours.
2) Cut a hole in the exact centre of the felt. Make it larger than the neck to allow for the collar later.
3) Try the felt onto the figure to test for size and fit. This will give an idea of how much you will need to trim or if you need a longer/wider piece. If necessary repeat steps 1 and 2.
4) Make slits from the side just under the armpits front and back on each side. Then trim the sides so that the overlap will not be too much. This may need to be repeated later.
5) Place the felt back on the figure. Trim the side seams if necessary. I have used Evostick Impact glue to seal the seam. Pull the flaps from front to back, making sure that there is not too much slack around the waist. Then trim a glue the flaps into place on one side.
6) Repeat with the other side, taking care not to rip the felt under the arms and again making sure that there is not too much slack around the waist.
7) Using small sharp scissors, trim the shoulder part so that it now arches upwards both front and back.
8 ) I made the holster by cutting a shape from thin black vinyl. It is turned into a working holster by putting a thin amount of glue on the fabric side and pressing it together.. I then put a thin piece of vinyl on one side to act as a connector to the belt.
9) With the tunic finished, it is time to add the adornments. Thin vinyl strips were cut and glued onto the felt to make the zips and belt. The felt in the foreground is a thin piece glued and folded over on itself to make the collar.
10) Small pieces of felt are glued over the belt to simulate the belt loops.
11) the same for the holster using the strap glued between the belt and holster.
12) The collar is added to the tunic by gluing it into place. The hands and boots are primed ready for painting whichever colour coded captain you are making. A fine line of silver paint is striped down the vinyl for the zip.
13) Links from fine chains are used to simulate the zipper catches and the belt buckle. Two small pieces of hardened clay are added to the shoulders for the communicator flasher and painted white and gold. The hands are painted in the appropriate flesh tones and the boots are painted to co-ordinate with the tunic. The head is then added and the figure is complete.
War is Peace. Ignorance is Strength. Freedom is Slavery.
-
Kambei
- Captain
- Posts: 291
- Joined: Mon Feb 21, 2005 4:57 pm
- Location: In The Village, where your days are numbered, and so are you!
![]() by Kambei » Sun May 17, 2009 7:03 pm
by Kambei » Sun May 17, 2009 7:03 pm
DartBrat701 wrote:Will you get one with Captain Ochre?

War is Peace. Ignorance is Strength. Freedom is Slavery.
-
Kambei
- Captain
- Posts: 291
- Joined: Mon Feb 21, 2005 4:57 pm
- Location: In The Village, where your days are numbered, and so are you!
![]() by Mary » Sun May 17, 2009 9:51 pm
by Mary » Sun May 17, 2009 9:51 pm
I realize I never commented on your excellent work. 
You have to admit it LOOKS easy until you start hacking away at the original figure, find out the other parts don't QUITE fit, and learn a whole new set of vocabulary words![[blablagrrr]](./images/smilies/motzred.gif "ranting") trying to get the finished product to look JUST right... Those Vivid Imaginations heads always give me problems, and the larger scale is much less forgiving than the scale you've chosen!
trying to get the finished product to look JUST right... Those Vivid Imaginations heads always give me problems, and the larger scale is much less forgiving than the scale you've chosen!
But when you're finished you are proud to show it off and put it on your shelf in a place of honor!
You have to admit it LOOKS easy until you start hacking away at the original figure, find out the other parts don't QUITE fit, and learn a whole new set of vocabulary words
trying to get the finished product to look JUST right... Those Vivid Imaginations heads always give me problems, and the larger scale is much less forgiving than the scale you've chosen!
But when you're finished you are proud to show it off and put it on your shelf in a place of honor!
"A brave man... and SO good-looking..." --Linda Nolan in CRATER 101
-
Mary
- Cloudbase Captain

- Posts: 284
- Joined: Mon Jun 21, 2004 2:18 am
- Location: Classified: Rainbow Clearance required
![]() by Kambei » Mon May 18, 2009 12:40 am
by Kambei » Mon May 18, 2009 12:40 am
Mary wrote:I realize I never commented on your excellent work.
You have to admit it LOOKS easy until you start hacking away at the original figure, find out the other parts don't QUITE fit, and learn a whole new set of vocabulary words
But when you're finished you are proud to show it off and put it on your shelf in a place of honor!
It never gets any easier. I have completed over 750 customs over a period of 25 years. If anything it gets harder as you refine your skills, because you expect a higher standard out of yourself, as do your peers. Especially when you look back at early works with an even more critical eye. As to parts not fitting,
 toy companies! Sometimes you get figures within the same company and within a particular series that are sculpted by different teams so that they have different articulation and the parts are incompatible , Star Wars, GI Joe, Marvel Universe (all Hasbro), then you get companies that can't seem to get their heads out of the late 70s/early 80s and the figures look too blocky, cartoony, or just downright suck (Mattel)
The Vivid heads aren't too bad. Some of them are quite good. The Angels they did are just awful, though. Far too masculine, but that is a problem that haunts many female action figures, even these days with full body and facial scans. Very few companies seem to get it right at that 1:18 scale.
I hear you about larger scales. I have tried in the past and given it up as a bad job. My admiration goes out to people who customise 1:6 (12 inch) scale.
As to the rest, watch this space.
War is Peace. Ignorance is Strength. Freedom is Slavery.
-
Kambei
- Captain
- Posts: 291
- Joined: Mon Feb 21, 2005 4:57 pm
- Location: In The Village, where your days are numbered, and so are you!
18 posts
• Page 1 of 2 • 1, 2
Who is online
Users browsing this forum: No registered users and 1 guest