Right, Let's Go!
Duncan Willis Scratch Builds A Jetmobile
Photos by Duncan Willis |
|
|
|
Had I been brave enough I would have attempted to make the whole thing in fibreglass, but I didn’t feel ready to use that medium for this project. Having never used fibreglass before I felt that it would have been too many firsts in one project, reasoning that I had a fair chance of making a satisfactory and durable model with the materials that I used and which I was comfortable with handling.
Once the basic shape of the Jetmobile was fixed there followed an awful lot of sanding, filling, spraying with filler/primer, more sanding, more filling and more spraying. Every time I thought I’d got to a stage where final painting and detailing was possible I came across further dings, pits, runs, damage and generally poor finish, so yet more filling, sanding and spraying with filler/primer ensued.
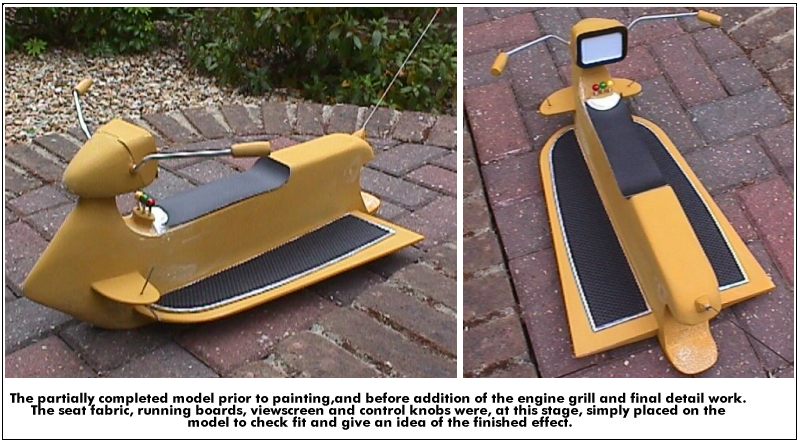
One major thing that I would do differently another time would be the engine bay and grill. I made the grill from plastic card, cutting out the 36 slots with a craft knife after having made a paper template first. I didn’t attach the grill to the Jetmobile until late in the building process, my idea being that I would first paint the inside of the engine bay with a dark gunmetal finish and then attach the pre-painted grill afterwards. What happened as a result of this decision was that I ended with a ridge around the edge of the grill where it meets the body of the Jetmobile, and despite more filling and sanding I couldn’t completely hide this. I also lost the gunmetal paintwork inside the engine bay because I couldn’t devise a way to properly screen this area when I sprayed the grill-to-body joins, and overspray resulted in an engine bay the same colour as the body. Another time I wouldn’t worry about the engine bay colour, but would attach the grill early on in the build, making a recessed lip in the body, so that the grill would end up flush, giving cleaner lines and being more true to the appearance of the original model.
I used car spray paints for the final finish - Vauxhall Rembrandt Silver for the main body colour, with Rover Pageant Mid Blue for the feature colour, which I outlined with a coach line in Humbrol gloss white, all after several coats of grey primer. I then coated the lot with a standard clear lacquer spray. This all actually proved to be a mistake. My lack of experience with the materials and poor information from the supplier resulted in a reaction between the paints, the filler and possibly the poly foam, with slight crazing starting to appear after the final coat of lacquer had dried.
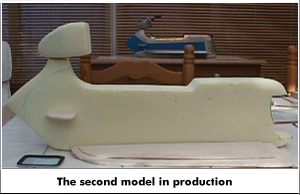
I am currently making a second Jetmobile and will be using only acrylic filler (designed for wood) and acrylic paints which should - I am assured by more than one source - result in a stable finish. The crazing effect is not too serious and is only really visible on close inspection, but nevertheless I will do everything possible to try to prevent it from happening on Jetmobile number 2.
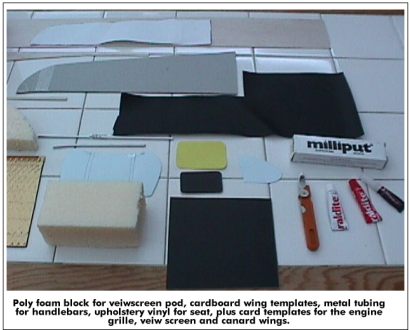
The final details I made as follows: The small control knob base I made from balsa, with Milliput modelling clay for the semi-circular surround. The control knobs themselves (moulded directly on top of the aluminium tubing), the base of the rear aerial and the handlebar grips were also fashioned from Milliput. The view screen is pale blue textured card with a clear plastic overlay, the black surround being cut from a plain black tile in a piece of cushioned vinyl flooring, with matt black Humbrol enamel painted over the cut edges.
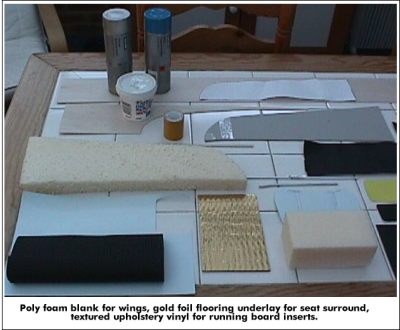
The raised running board surrounds were formed from thin balsa strips stuck on top of a balsa base shape. I cut and mitred the surround strips, sticking them to the edge of the base with pva, then filled the gaps with model filler to make the curves, the whole lot then being covered with kitchen foil to create the chrome metal effect seen in the show. The running board inserts were made from black textured vinyl upholstery fabric, epoxied into place, and the seat itself I made from a black leather-effect vinyl upholstery fabric - both seat and insert materials being obtained as off-cuts from an upholsterer’s shop.
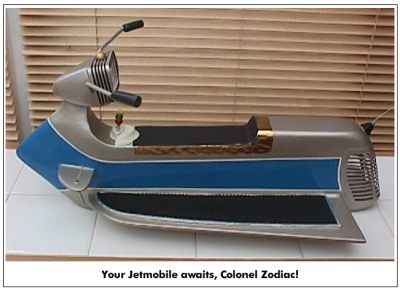
Finally, I painted the detail work with Humbrol enamels - gunmetal for the handlebar grips and rear aerial base, matt black for the “openings” on the rear edges of the wings, gold for the hemisphere (light?) on top of the viewscreen cowling and red, green and yellow respectively for the control knobs. The gold seat surround is the foil surface from an underlay used for wood and laminate flooring. I stripped it away from the foam backing, applied the thin foil to double-sided carpet tape (I work in the flooring industry, so you may have noticed more than one flooring product in this build) and then cut it to the shape of a paper template that I had previously made before carefully peeling off the tape backing and applying it to the model. At the last minute I added thin strips of black insulating tape for the detailing on the outside of the viewscreen cowling - a feature I had seen only on Robin Day’s computer model until I noticed it by chance whilst watching one particular sequence in one of the Fireball XL5 episodes.
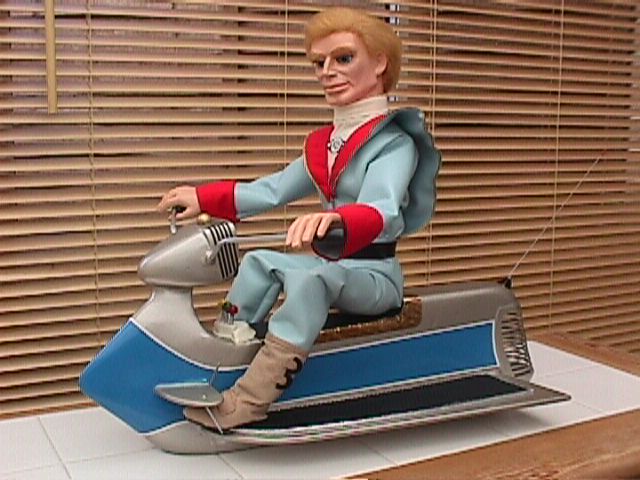
And that was that - one completed full-scale Jetmobile replica, straight out of the workshop and ready for its proud new owner on his return from the outfitters. The build had taken nearly seven weeks of evenings and weekends and one or two middle-of-the-night sessions when I couldn’t sleep. The result is far from perfect, and no doubt a professional model-maker would throw up his hands in horror at some of my techniques, materials and overall finish, but I am happy with my first-ever scratch-built model, and I certainly haven’t heard any complaints from Colonel Zodiac since he took delivery of his shiny new Jetmobile!

VISIT THE FIREBALL XL5 STORIES PAGE
Any
comments? Send an
E-MAIL
to the
SPECTRUM HEADQUARTERS site